Category Archives: Uncategorized

Failure

There has been a lot of failure around Gnome Knoll lately, and not just a failure to blog. The biggest failure has been my own inability to be patient and go with the flow. Rather, I have been trying to get too much done in too little time and then creating more problems for myself that slow me down even more. I’ve been pushing myself and my equipment too hard and then things break. Fortunately I haven’t broken anything that I haven’t been able to patch up myself, at least temporarily.

Someday maybe I’ll think back on these events and laugh at myself. For now I will try to slow down, reassess what needs to be done, and set more realistic goals for myself.

Blogging with few readers

Why am I doing this blog? It is a lot of work, especially for a slow and somewhat deliberate writer like myself. Isn’t it taking away time from getting something else done? Well, I happened to see You should blog even if you have no readers on a techie blog and I thought it described some of the reasons I started blogging, and that it made the subject worthy of a post.

Nathan’s main points are that it makes you a better reader when you’ve been writing more and that it makes you smarter by making you focus on your thoughts. Go read his blog for the details. That’s not all the benefits that I personally get.

Blogging keeps me from wasting time doing other things on the Internet. I gave up TV a long time ago, but can still try to relax looking at stupid fails and silly cats. It doesn’t help as much as blogging. It takes a lot of energy to blog. When its the end of the day and I’m tired, but I have some pictures to upload and write about the energy spent pays returns in uplifting my spirit. It doesn’t matter whether someone reads it so much as someone could read it. Someone could be inspired to do that little bit more in their yard, garden or life to be more resilient.

Blogging also puts my ideas out there for feedback. Maybe someone will read it and have an idea to do something better than I have. I am always eager to learn better ways of doing things, and it is only through dialog that I’ll learn about them.

Blogging also captures my failed experiments. This also goes under making you smarter. When you blog about something you’re trying and you fail, you are going to learn more from that failure by blogging about it. And you are going to blog about it because of that one reader who might have thought that was a neat idea too.

So I am going to keep blogging, even if my Mother again says “Oh, I forgot about your blog.”

West Garden, Camp Garden?

I wanted to do a post about the older garden area at the camp, but as I was working on it I was having difficulty with the names of places. This is something I thought about a few years back, but never got around to addressing properly. When you are trying to describe something, it always helps to have a good name for it. None of us in the family are really good at names, but if we use them often enough they will stick. We just have to figure out what to use and agree on it.

So this post will have two purposes. To describe the layout and features of the camp garden (I don’t like that name), the west garden (might not be scalable) or whatever we’re going to call it, and to generate discussion about the names. I could wait, but in the spirit of not trying to get everything right up front, I’m just going to describe it without a proper name. Don’t forget you can click on it to see the full size version.

Garden

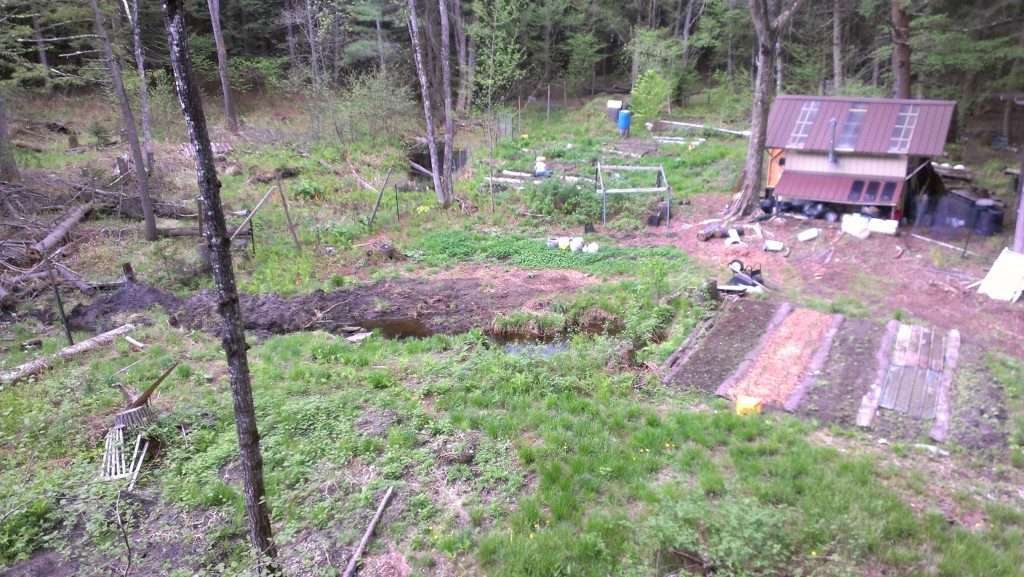
High view of most of the garden.

This picture was taken from way up a ladder against a tree. Why that ladder is there will be a post for another day. The next picture is the same, except that I’ve annotated it with various names.

Garden annotated

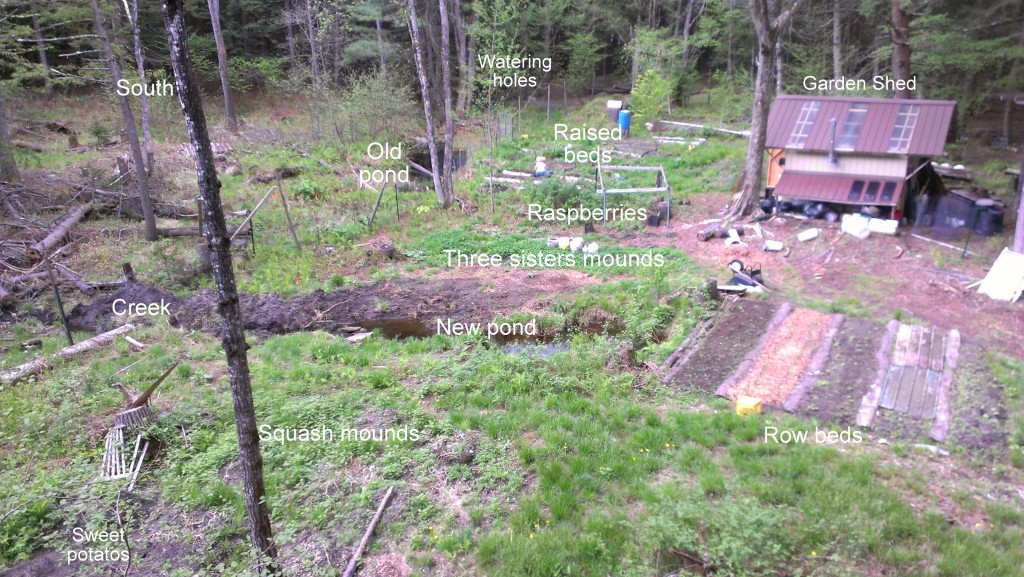
Same picture as above with annotations

Some of those names are OK, as they are descriptions that are unique, such as the raspberries. Others don’t work at all, such as old pond and new pond. What happens when I dig another one?

Initially I was going to describe all the different labelled areas in more detail in this post. However, it is getting late so let me just give an overview today.

All of the garden is surrounded by fencing. It is a mix of four foot metal wire fence and seven foot plastic deer fence. So far that has kept the deer out. The metal fence on the south side is barely standing up as I never went back to redo it after Irene, but it is holding. There are three gates out of the picture that I can open to get the tractor through.  For people, the shed is on the fence line and has doors at both ends and there is another people gate by the ‘old pond’.

There is still a lot of area for beds within the existing fence perimeter. Some of that I have held off on building beds because I knew I’d need space to dig the ‘new pond’. Other areas don’t get as much sun and I just haven’t gotten to building beds there yet.

South is to the upper left of the picture as labeled. The garden gets OK sun, but some areas are much better than others due to the forest all around. This location was picked for the proximity to easy water and that there were a few trees down already so I could get started without cutting as many at first.

The things I need names for are the whole garden which can’t just be called garden, because there are going to be gardens at the house as well. I also need to name the ponds a bit better. As labeled there is ‘old pond’, ‘new pond’ and ‘watering holes’ which are a series of little ponds that may eventually be connected. The ‘watering holes’ are under the trees on the west side and can’t be named that, because there will be more of them around as well, such as the new one up the hill from the house.

I could be a geek and just number them, but then I probably couldn’t remember them that well. I was thinking of maybe naming some things for North Shore towns. Any other ideas?

Solar Shed

John Robb at the Resilient Communities web site is looking for examples of Solar Sheds. OK, he’s talking about sheds that power a house. Still,I’ll take that as a sign that I should write up about my own simple solar shed.

The garden area at the camp is off grid, but there isn’t a need for a lot of power. Lighting and a little pumping are the primary needs. A radio is nice to have. I might have some low power automation for the garden some day. Wifi would be cool. Whoa! Getting carried away there.

The primary lighting is through integrating plexiglass panels in the roof for daylighting. I alternated metal roof panels with plexiglass ones. The shed was located under trees to keep it from overheating in the sun in the summer, otherwise this would allow too much heat in with the light. You don’t really want regular windows in the shed if they can be avoided, because they take up valuable wall space that is needed for storage. Putting windows in the roof works well for this situation. The plexiglass and the metal roof panels both have two inch ridges that overlap nicely. In the winter it even gets some solar heat after the leaves fall.

Solar Shed

Skylights on the roof. Solar panels down low on the north east corner where they will get the most sun with that big birch to the south.

Battery and wires

The battery and the mess of wires with the controller. Not the prettiest, but it works.

The rest of the power comes from three 15 watt cheap amorphous silicon solar panels. This type of panel can work in partial light which, given the location of the shed, is critical. I have them mounted low on one side of the shed that gets some sun in the morning. It might look weird to have them located there, but that is the best location given the primary goal of keeping the shed cool.

Charge Controller

This one has three connections. Panels, battery and load with a low voltage disconnect on load to protect the battery.

The solar panels feed a low end charge controller that is usually connected to a 12v deep cycle battery. I have a separate smaller 12v gel battery that I used for pumping that gets swapped in for a recharge when needed. In prior years, I was only at the camp on weekends so it was easy to get the watering battery recharged over the week. This year I may have to look into another way of working.

The deep cycle battery powers 12v LED landscape lighting in and around the front and back of the shed and a 12v radio designed for car or boat use. The lighting was bought on the cheap from one of those job lot stores and is supposed to be run off a 12v power supply, but they do fine with a 12v battery operating in normal voltage ranges.

Lights

Outside 12v LED landscape lights retrofitted for the shed. I used 120v plugs because they were cheaper than anything I could find for 12v.

So that’s my simple solar shed. It gets the job done and it was pretty cheap. Nothing really fancy, at least not until I get wifi working over the old Dish TV receivers.

If you eat it, it’s not a weed

Dandelion greens ready to be picked from a yard

Dandelion greens ready to be picked from a yard

When I was growing up I was taught to believe that weeds were particular plants, like crabgrass or dandelions. Now I know better. Weeds are simply things that are growing where you don’t want them. Therefore one way to get rid of weeds is to change your attitude. “Well, nothing else grows there easily, at least the crabgrass is green.”

Or “Hey look, free greens for my salad, right in the middle of my lawn.” Now I’ll be the first to admit that dandelions are not the tastiest of salad greens, but they are not too bad either and the price is hard to beat.

As a kid, another thing I was told about dandelions when I was sent out to dig them up from the grass was that I had better be sure to get the whole taproot or it would just grow back again. Anyone who has tried to do this knows it is very hard to get that whole taproot to come up with the rest of the plant. Even with a special weeding tool, I never seemed to get the whole taproot.

Here I pulled up harvested some dandelions that were growing in a raised bed. Because the soil in the raised bed is loose, it was easy to pull up the whole taproot. I was surprised at how long they can be. No wonder I couldn’t get them out of hard compacted soil. Below you can see that the taproot is longer than the leaves.

A very long dandelion taproot

A very long dandelion taproot

Edited to add: Another advantage of pulling the dandelions out with the taproots intact is that they won’t wilt as fast. So if you leave them lying in the kitchen until after you finish eating dinner, hanging laundry, blogging, etc. they can still be washed and put away in the fridge.

Also check out these articles on the value of dandelions: The dandelion is a healthful, great tasting weed you can eat 

Eating Dandelions

It appears that now is the time to pick them, and they are best before they flower. Though the ones that I picked were not that bitter whether they had flowered or not.

Digging more ponds

It has been a very dry spring so far. It hasn’t rained substantially in weeks. Fortunately, I have a small backhoe and like digging small ponds. I do this in areas where the water naturally accumulates, so that we have some for the dry spells.

However at the new house, we didn’t have any ponds and now we have garden beds. My first little ponds was a big success, even getting a frog to move in after a day. Yet it isn’t close to the current beds I’m building where my peas are already. It isn’t efficient to be carrying watering cans back and forth over 35 yards several times to water.

Ideally, I’d have water above the garden and get some drip irrigation like I saw at a workshop put on by the Grafton Nature museum a couple of weeks back. So this evening I went looking for a good spot up the hill a bit. With it being so dry, it was hard to find anywhere that looked any better than anywhere else, but there was one area where I knew water should be.

Dry Creek

Currently dry creek, but obviously where water comes down the hill.

There is a creek bed where water is often coming down the hill. It’s a bit far from the garden beds, but definitely above them. I decided to try digging there to see how it would go and what I might encounter.

New Pond

New pond to capture the water when it comes.

I was really surprised how dry the ground was up here. I still have very wet areas in the yard down below, but this hole was very dry. Fortunately, the ground quickly turned to clay. That wouldn’t be good for planting in, but here I want to hold water, and clay is good for that.

There is a little seeping coming out right under where the creek is. If you look very very carefully at the picture you can see the wet spot in the middle. Well, I can see it even if you can’t. After taking the picture I dug it bigger and a bit deeper and hit another little spring. By tomorrow I expect that the hole will be mostly filled with water. Stay tuned.

Deep hole